The link that seen below this paragraph depicts the Star Now callout that I produced on Friday 23rd October 2020 asking for possible voice performers who could provide their vocals for the short Audiobook/Drama;
The link to the PowerPoint Presentation that contains all is the sketchbook pages depicting the written development and scheduling for this project can be seen below;
The screenshot below depicts comments/critiques provided by Andrew (fellow colleague in the course) on what I’m doing so far. Another Screenshot that follows depicts the critiques I’d given Andrew when he was going through his project;
The embedded YouTube video that is linked below showcases the rough edit of the opening sequence of ‘The Magic Wood’. This was done as I tried to upload the original wav and mp3 files to the blog but they couldn’t upload;
The Word Document linked below depicts the messages I sent to the two chosen performers who’ll providing their vocal talent for this student production (This was written before the final recording sessions that took place during the second week of the project);
The Unlisted YouTube video shown below depicts the first recording i made on my own within Microsoft Teams which will be implemented in the recording sessions on Thursday and Friday (although this subject to change depending on how the performers feel on the day or other factors that might prop up);
The next two Unlisted YouTube Videos depict the edited recordings I done with both ‘Anthony Stuart Lloyd’ and ‘Jessica Gittins’. Added Noise Reduction and -24 Loudness was applied to the chosen takes to make it sound more polished and professional:
The YouTube Video embedded below depicts the edited slideshow presentation of the recording session I done with ‘Anthony Stuart Lloyd’. The video was edited to together by Anthony and the video is located on his channel ‘anthonystlloyd’;
The Unlisted YouTube Video that can be seen below depicts the final edited rendition of the audio drama ‘The Magic Wood by Henry Treece’ for Project 3. The Audio Drama was edited on Adobe Audition;
A link to a Word Document containing the Harvard Referenced Research performed for this project can be seen below;
The positives that are present within the final edit of the audio drama ‘The Magic Wood’ is how the individual performances of Jessica and Anthony overlap each other seamlessly despite the fact there were two separate recording sessions with the performers in question relying on my direction alongside describing the basic outline of how the drama will come together. The music and binaural effects are also worth commending as they both enhance some scenes within the production as well as mimic the standard quality that is found within professional Audio Drama Productions.
Negatives prevalent however mostly relate to the production feeling as if it needed more sound assets to flesh out the audible world which I feel is slightly lacking in my production. Some sound edited tracks of the performers appeared unrefined and needed more adjustments so the vocals blend in with the rest of the environment (This can also be said of other sound tracks that had similar issues).
Improvements that I would have considered if I had more time or if I find myself doing a similar project in the future will be focused on discovering methods in creating more seamless transitions and overlays of different sound tracks so the entire production runs in a smooth manner without repetitive ticks that come in the form of sounds not natural to the constructed environment produced for the production.
Thoughts I have overall for this project is mostly positive and relief considering that I managed to produce a full-cast audio production within two weeks under the current circumstances at the time this was written in relation the government lockdown implemented within the United Kingdom. Although I would like to a similar production again in the future the need to have a timeframe of more than two weeks will be refreshing as well as provide the necessary time for me to refine and tweak the production to the highest standard.
Further Harvard Referencing (Project 3 and ‘The Process Book’):
InDesign Research (The Process Book):
Angelo Montilla, 2020. How to add videos to an interactive layout in Adobe InDesign – YouTube. Available at: <https://www.youtube.com/watch?v=yhTliWR5O6k> [Accessed 05 November 2020].
Pariah Burke, 2017. InDesign: Adding Background Colors to Pages in InDesign (All Versions) – YouTube. Available at: <https://www.youtube.com/watch?v=54fWWLxMxmw> [Accessed 05 November 2020].
The Sketchbook Page seen below showcases the original notes and mind maps expanding on the narrative which will be in the final animated segment which will be produced in the next two weeks;
Mindmap.
Further Sketchbook Pages below showcase two possible narratives that were considered for the animation with the ‘Hyter Sprite Transformation’ idea being the final one chosen. Storyboards were produced to showcase what bot ideas could’ve looked like if further expanded upon;
Storyboards
Notes on After Effects features that will be implemented into final animation.
The sketchbook page that can be seen below further expands on how the Fairy Transformation will look like with added notes dictating which animation techniques will be used on the fairy herself. Facial Expression storyboard depicts the prominent animation which will be prevalent on the fairy when she appears. Apart from her facial expressions that rest of the fairies body won’t move or at least this is what is planned at the moment;
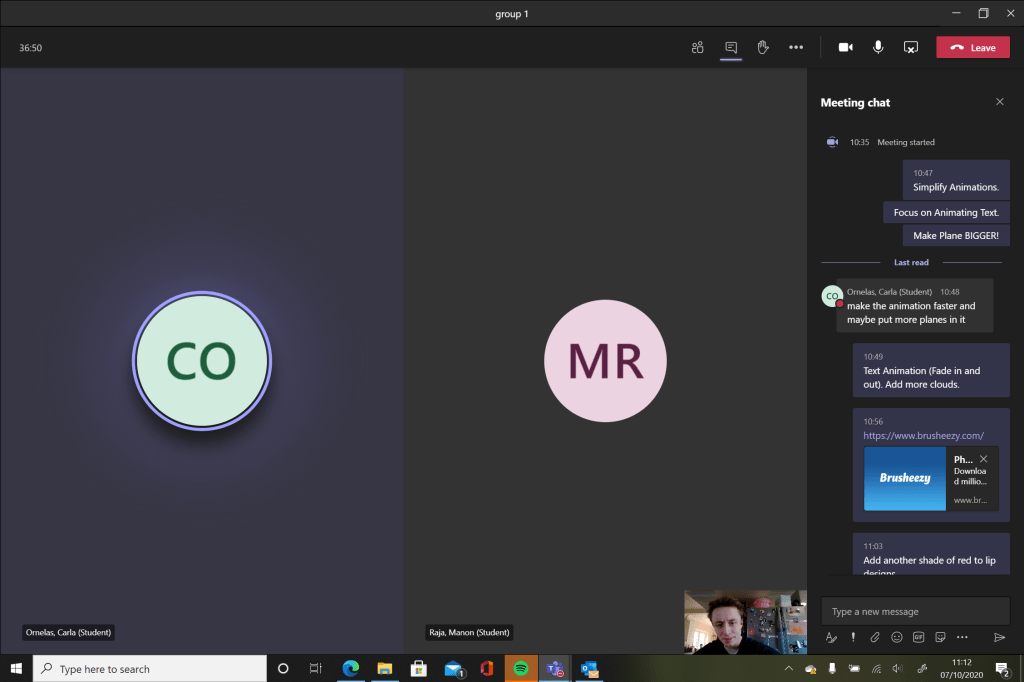
The photo and screenshot that can be seen below showcase the critiques I made to Manon (Fellow Colleague) in relation to her current work development as well as comments from her relating to what I need to consider for the animation I’ll produce;
Microsoft Teams Meeting Screenshot. My Comments to Manon via Chat on right hand side.
As is written in both the sketchbook pages above the animation project changed from the ‘Fairy Transformation’ back to the ‘Fairy Ring’ idea after gaining new enthusiasm for the idea which will incorporate unused VR photos that were taken earlier in the year.
The idea of the short film being the viewer will be in the centre of the ring seeing the fairies appear alongside the mushrooms before the said fairies disappear with only the mushrooms remaining. This came as quite a nice revelation considering I unsure on how the idea could be realised.
VR Footage was considered but i felt it was better using Photos as it’ll save space on the final film itself, focus on the animations of the fairies and the mushrooms themselves. I also at the time i written this down could’nt access the said footage for some unknown reason so the decision was made to use the photos which were accessible rather than spend time trying to recover the footage.
Three of the Insta360 Photos (taken originally for the ‘Graphic Design for the Web’ module) that were considered (one of them being chosen for the final film) can be seen below;
IMG_20200227_171040_00_028.insp (This will used for the final VR film).IMG_20200227_164732_00_022.inspIMG_20200227_165857_00_024.insp
The 10 second YouTube clip embedded below showcases my attempt at the ‘Electric Ball VFX’ tutorial on YouTube which was considered for the transition effect for the mushrooms to appear. Despite creating this effect it became clear at the end that there was no way for the background to be transparent thus another tutorial called ‘Glowing Orb’ was used instead. Despite this I felt it was worth linking it to this post to show the experimentation I performed for this project:
Two screenshots below highlight key comments from the ‘Electric Ball VFX’ tutorial that answered questions to issues that I came across while watching the video. The ‘evolution’ issue was sorted but the transparent wasn’t thus why this VFX piece was not considered for the final VR film;
The first experiment I performed with the ‘Lighting Effect’ (Mock Fairy) laid over the Insta360 Photo (IMG_20200227_171040_00_028.insp) can be seen below. I thought it looked really effective the risk of combining elements that could or could not have worked. As can be seen the second video produced on 15/10/20 it was a matter of making the animations small enough so the viewer can see them as well as the animations not disappearing off out of site, creating disorientation to the viewer in question;
First Experimental Video. 15/10/20.
Second Experimental Video. 15/10/20.
The four embedded videos that can be seen below depict the individual animations produced on After Effects using tutorials which are Harvard Referenced in the ‘Research Word Document’ which will be be linked at the end of this blog post. The After Effects Animations are then placed within Premiere Pro as seen in the experimental videos above this paragraph;
‘Light Stroke Effect with built-in Plugins’ (1). Mock Fairy.
On Friday 16th October 2020, i experimented on After Effects and Illustrator to produce a Mushroom animation which will be needed for the middle and ending parts of the VR film that’ll be produced for Project 2. The two PNG’s below showcase the early experimentation on Illustrator using the the ‘Watercolour brush tool and Wacom pen tool’ opposite the traditional ‘curvature tool’ technique. Research that informed the Illustrator experiments are Harvard Referenced in the Research Word Document which will be linked at the end of the this blog. After experimentation was done it became clear that the ‘Curvature’ Tool’ is not only quicker to produce an effective mushroom illustration but is also appropriate considering the short period that is given for this project:
‘Curvature Tool Experimentation’
‘Watercolour, Wacom Pen Tool Experimentation.’
Two PNG Files that were used for the animation experiment performed on the 16/10/20 can be seen below. The animation technique I applied on the mushrooms as they fade in and out is the same one used for the ‘Great Stukely Logo’ in Project 1 called ‘Text Animation-Writing Text Effects- No Plugins’ which felt looked really affective and will look great in the final VR Film;
The embedded Unlisted YouTube link can be seen below showcasing the finished Mushroom Animation with added distortion effects and a Glowing Orb Transition feature;
The experimental distortion effects i applied to the mushroom that appears in the middle section of the video above comprise of ‘Stroke’, ‘Bulge’, ‘Spherize’ and ‘Ripple’. I might apply these four effects during the transition phase when the mushroom is materialising into existence. Three Mushroom Animations will be produced surrounding the viewer of the VR film (create three different mushrooms?).
After some thought i will start the film with the VR photo being in monochrome initially till it changes to vibrant colours at the end emphasising the magical supernatural occurrence that is happening in the scene. I might include stock sounds of animals in the film if need be. Four to Five Mock Fairies will be created and multiplied within the film itself. Animations will be produced on After Effects first (Mushroom and Fairies) then applied within a Premiere Pro Program where the final VR Film will be rendered.
The seven second Unlisted YouTube link below showcases the 360 photo transition from Monochrome to vibrant colour which I referred to earlier in this blog. The use of tweaking the Opacity feature was used prominently for this sequence;
(17/10/20) The embedded clip below showcases the early development of how the final VR Animation will be structured. The ‘Bensound’ Royalty Free Music ‘Piano Moment’ felt more appropriate and whimsical compared to the other royalty free music I chosen which comprised of ‘November’ and ‘Relaxing’. The VR Transition I’ll use for the final film which can be seen below will be ‘VR Spherical Blur’ rather than ‘VR Chroma Leaks’ presented at the end of the mock film below;
Two JPEG’s that can be seen below depict the two final Mushrooms/Fungi that will appear in the final VR animation for Project 2 with added colour combinations that were used for the individual designs;
The first 18 seconds showcase the Mushroom transformation scene that will appear in the final VR animated film. This is the second mushroom animation that I produced for the animated VR film ‘The Fairy Ring’. I felt it was appropriate to call the film @The Fairy Ring’ as links to the original English/Cornish Folklore that researched during Week 3;
Second Mushroom Animation. 17/10/20.
First Mushroom Animation. 17/10/20.
The embedded Unlisted YouTube video below showcases the final opening title sequence to the VR Film which incorporates the techniques used for the mushroom animations. I thought it looked very nice after the brief period of experimentation thus why the clip below will be present in the final film. The font used for the opening title is ‘Viner Hand ITC’;
Final Opening Title Intro.
The embedded Unlisted YouTube Videos that can be seen below showcase the various final ‘Fairy Animations’ which will be incorporated into the final VR animated film. These animations were produced on Sunday 18th October 2020 using the YouTube link Harvard Refenced below this sentence. Experimentation performed using ‘Turbulent Disturbance’, ‘Wave Warp’, ‘Ripple’ and tweaks to the ‘Glow’ ratios achieve the final results present in this blog;
(19/10/20) The two embedded Unlisted YouTube clips seen below showcase the updated ‘The Fairy Ring’ title sequence and ‘A CALLUM FORSTER FILM’ with the added glow effect to link to them of glowing fairies and magic that is present within the two minute VR Animation. Thought it would be cool to create my own opening title animations which feel turned rather nicely after a bit of experimentation using the ‘Distort’ features on the ‘Effects’ section;
(20/10/20) First Edit of the VR Animation ‘The Fairy Ring’;
The Embedded YouTube link below showcases the final edit of the Short VR Animation ‘The Fairy Ring’ completed before the final session dedicated to group critique on individual Project 2 development so far. The cog symbol on the bottom left of the video has to be selected with the ‘720’ option selected so the quality of the video is lowered to a blur (20/10/20):
(21/10/20) After receiving feedback from Tina during a Microsoft teams Meeting the selected tasks set out for me to complete before the 22/10/20 deadline is as follows;
Incorporate actual photos of mushrooms rather than Illustrator images (looks more effective and magical. Images will be found on the internet and Harvard Referenced in the Research Word Document at the end of this blog.
Make it clearer the fairies are creating the mushrooms. I will tweak the animations so a select few circle around the mushroom transformation until the mushroom is fully formed.
Tweak the opacity of the Fairy animations to make them look more ethereal or increase the colour adjustments of the VR Photo chosen for this project. I will attempt to tweak both these areas.
Four Images that were found on the internet that appear in the VR Animation ‘The Fairy Ring’ can be seen below alongside separate image files that were produced for the four after effects animations for the final animation;
The Unlisted YouTube links seen below showcases the Mushroom animations using photos from the internet;
The final edit of the VR Animation ‘The Fairy Ring’ with added tweaks as suggested by Tina (Main Tutor) can be seen linked below;
The final thoughts that I have as a whole after completing this particular project is mostly positive considering the last minute change of concept from drawing a actual fairy to creating ‘The Fairy Ring’ narrative depicted in the abstract two minute VR Animation that I eventually produced.
The animations of the glowing fairies and the fade in/out transition effects on the mushrooms I thought looked very effective and high quality despite the large amount of time put into experimentation to achieve these particular effects as documented through screenshots and unlisted YouTube Videos throughout this blog.
The only negatives that occurred during the development of this film is how much time was dedicated to some sections of the film more than others (Focused more on Animations rather than standing back and see how the animations compliment the narrative I want to tell in the film) alongside trying to create to many assets within a short period of time which i only just managed to complete a day before the submission of this pilot project.
Improvements and factors that I’ll consider from this project is to be more productive during the first week rather than the second week as I wasn’t very productive in producing work during the first week of this project than I was in the second week. This would allow me to stand back and see how all the components work together and compliment the story as well as spend time on how to create a more polished VR Animation presentation which I felt I didn’t achieve for this particular pilot project.
The link to the ‘Research for Project 2: Harvard References’ Word Document can be seen below;
The sketchbook pages that can be seen below showcase feedback from Tina on the Microsoft meeting held on 30/09/20, early script development for the final dialogue spoken within the advert (Including final track chosen from the Adobe Audition session performed on 03/10/20) to extra notes documenting further research in producing the final logo animation. A page was also dedicated to the development of ‘The Process Book’ as well;
PNG Files linked below showcase the final logo separated in individual files with a transparent background. This was done so separate animations can be done on the letters and paint strokes to make the final animation appear seamless within the final Village Advert. The final logo was animated separately from the advert on After Effects;
The Final PNG File below depicts the final Logo (and extra information for the ‘Stukely Parish’ website) that will be depicted in the final Village Advert:
The First Draft of the ‘Village Advert’ with the ‘Final Logo Animation’ can be seen embedded below with the Royalty Free Music ‘Memories’ from http://www.bensound.com. Video was produced on 04/10/20:
Three photos below depict the equipment I used to record the footage which can be seen in the embedded YouTube link above. The equipment in question consists of a Canon EOS 4000D Camera and a Manfrotto Tripod. The day the footage was shot went very well throughout the afternoon;
‘Canon EOS 4000D Camera’.
‘Manfrotto Tripod’
‘Battery Charger with SD Card’
Further Development on the Advert can be seen below with an email from Tina (Tutor) providing critiques on how the ad itself can be better presented. The two ‘Lumetri Effects’ used on Premier pro for a select few clips within the ad is also seen below. The effects were added to make the footage more in sync with the family friendly; several of the clips were more brighter and clearer in presentation than others:
The final edit of the film with a slightly tweaked logo animation transition can be seen embedded below;
Link to original Word Document that contains all the Harvard Referenced Research performed within Weeks 1 and 2;
Screenshots (Microsoft Teams Meeting. 07/10/20) and a Sketchbook Page highlighting key notes and critiques both what I received and what I given out to both Carla and Manon (fellow colleagues in the course);
The embedded Unlisted YouTube link showcases the final version of the advert applying the feedback provided by Carla and Manon (Fellow colleagues in the colleges) earlier in the Microsoft Teams Meeting at 07/10/20. Although the feedback was helpful and did improve the advert there are still a issues with the final presentation with some edited footage being more oversaturated than others. Despite this the first project went well overall;
The link that is placed below contains the sources to various Research Sites and Videos that I overlooked during Weeks 1 and 2 for Project 1. All Links are Harvard Referenced;
Final Thoughts/Evaluation of the First Pilot Project:
The positives aspects that can be found within the first pilot project, in the form of the mini-documentary, is how smoothly the developmental process proved to be despite the restrictions imposed during the Covid-19 Pandemic in 2020 at the time this evaluation is written. The written and verbal feedback picked up within the Microsoft Teams Meetings in relation to the mini-documentary proved to be very productive into producing a more structured edited production.
However, the negatives that were prevalent in the project is once again related to the Covid-19 Pandemic which made it difficult to gain access to the university initially, thus why the footage which was shot appeared lower in quality due to usage of a camera I have at home rather than the higher quality equipment the student services provide within the university.
Improvements which will be implemented in the future if I produce a documentary production is to involve a group of people within and outside the university who work on specific areas of a documentary production which was absent in the original developmental process for this project. As a result of this absence, the mini-documentary was lower in quality in comparison to similar productions I done for the Digital Media course in past modules over the last few years.
Final thoughts I have overall after completing the work for the first pilot project is although I managed to put together a short and informative mock advert that delivers on what its suppose to be within a short period of time, it has become apparent that I tried to produce a production that needed more time to be the appropriate quality it needed to be as well as the realisation that a group collaboration with other creatives was also needed to improve the quality of the production as was the case in the third pilot project.
This post document the development and research performed for the first project laid for trimester 1 within the third and final year of the digital media course;
A link to the PowerPoint Presentation I gave in Week 1 during a Microsoft Office Meeting can be seen below;
The Sketchbook Page that can be seen below showcase notes and added tweaks to the existing projects after hearing feedback from Kurtis Bevan, Manon Raja and Fabiano Taveres;
Further Sketchbook Pages that can be seen below showcase early storyboards for how the short advert for the village I live in will be presented as well as logo experimentation;
Another Sketchbook Page that can be seen below depicts notes i taken after watching a YouTube video online discussing tips and key features that are needed to make an advert. Like other sites and videos used for research it will be present in a work document either in this blog post or in blog post for the Third Project. Further development and fleshing out of the adverts content can be seen throughout the entirety of this post;
Word Document Link below expands on Logo Experimentation performed on the website CANVA (as reccomended from the ‘Business for the Creative Arts’ module from the second year). Despite the decision to create a new logo from scratch within Photoshop the experimental logos do have an influence on the final logo for the short advert;
Three JPEG’s below showcase the initial experimentation (Fonts, Colours etc.) performed on Photoshop;
Third Attempt.
Second Attempt.
First Attempt.
Due to technical difficulties with the Adobe Photoshop program which I used for experimentation I had to save the detailed sheets/experimentation of the brushstroke effects found on ‘Brusheezy’ and other details like fonts to PDF documents. The links to the said PDF documents can be seen below. ‘Underline Photoshop Brushes 3’ variants that I chosen are 3 and 8, I mention this here as I haven’t made it clear in the original PDF Document;
JPEG depicted below shows the final design for the logo which will be present present in the final advert near the end with a unique fade-in transition over footage that I will shoot within the village;
The link that is placed below contains the sources to various Research Sites and Videos that I overlooked during Weeks 1 and 2 for Project 1. All Links are Harvard Referenced;
The photos that can be seen below showcase the early notes (development) depicting the initial concepts for the possible three pilot projects;
Second Sheet expanding on possible Three Pilot Projects.Notes taken when reading Articles linked to the ‘Three Pilot Project’ CANVAS page.Second Sheet expanding on possible Three Pilot Projects.
The link that can be seen below showcase he research i performed before the start of Trimester 1;
(06/05/20) The word document that can be seen linked below expands on the links given out by Emily (Tutor of this Module) for Processing and NCH Software after talking to her during the Zoom chat on Wednesday 6th May 2020;
Three videos can be seen below showing the early testing of the software which I felt went very well. This was also applied to the VLC software with little success due to the VLC software not having the capacity to record audio on the computer which is a problem considering I need to talk over the tutorial to specify key information that will be in the final tutorial. Despite the problems encountered in the ‘VLC Software’, the NCH Software’ manages to have the capacity to record audio so its this software that will be used for the final tutorial with Uttara;
The screenshots that can be seen below shows where the recordings are stored on the downloaded NCH software. Once the recording is dragged out of the ‘Find and Play’ box onto the desktop, delete the original recording in the box to loosen up space on the computer;
(10/05/20) The screenshots that can be seen below showcase a further design produced by myself to propose to Uttara and choose between my design and her design. Further notes and a rough dialogue is written out for the introduction of the tutorial which has been discussed in depth on Monday 10th May 2020;
Link to Word Document below further showcases a referenced link to research performed for this module;
(18/05/20) Photos of Sketchbook Pages below showcase the rough script I produced for the Tinker CAD section of the Tutorial produced opposite Uttara and a page dedicated to the possible ways the final speaker would’ve been presented in the ‘DM Tech Fest’ if it wasn’t cancelled due to the Government Lockdown in the UK due to the Coronavirus Pandemic at the time this was written;
Links to video tutorials used to edit audio on premiere pro for final tutorial;
Travel Explore Click, 2018. How to Improve Audio in Premiere Pro – YouTube. Available at: <https://www.youtube.com/watch?v=U1rQ4xFQyrA> [Accessed 18 May 2020].
THAT ICELANDIC GUY., 2020. How to Remove Background Noise – Adobe Premiere Pro 2020 Tutorial – YouTube. Available at: <https://www.youtube.com/watch?v=DuEuLjH01I4> [Accessed 18 May 2020].
The two screenshots that can be seen below showcase the rough setting of one of the sound features applied to the dialogue on the final tutorial as well as early music visualization via the processing program;
The First Word Document that is linked below showcases the coded settings that were performed in the music visualization that will be present in the final tutorial;
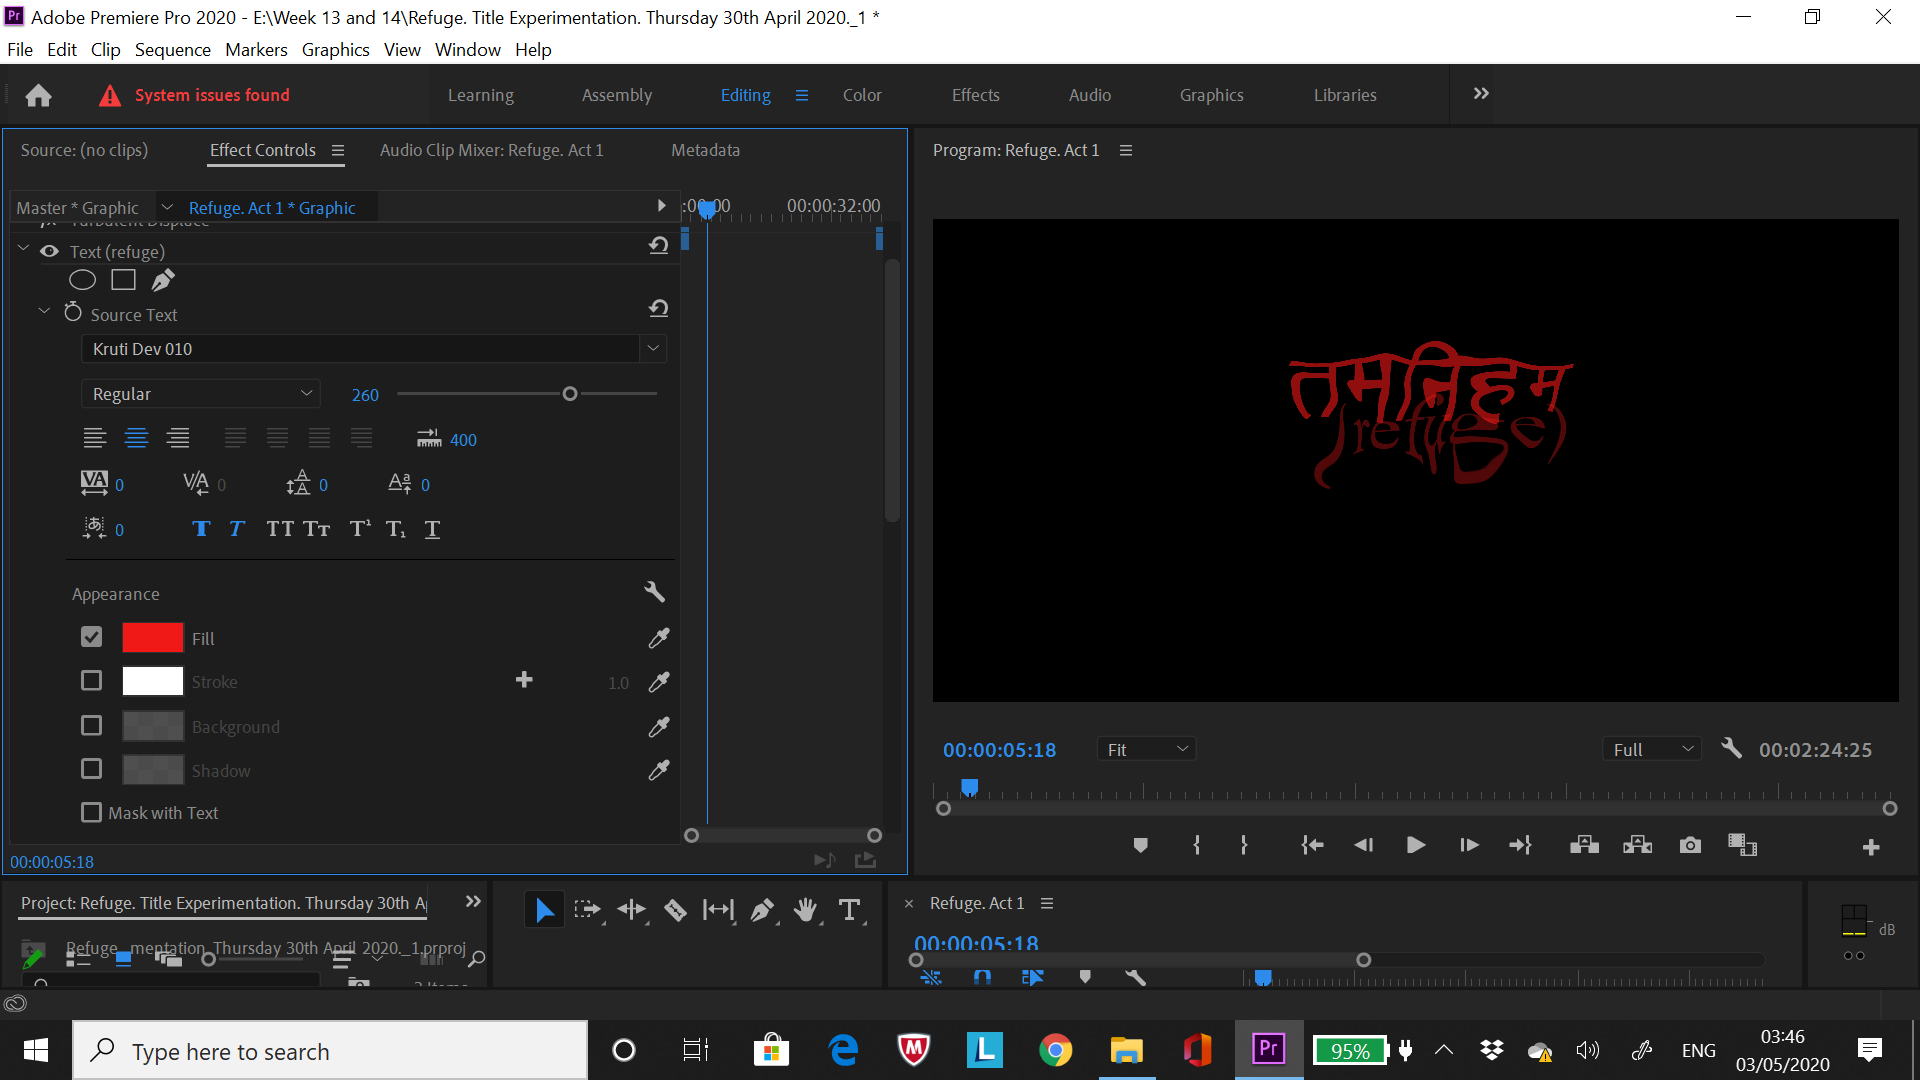
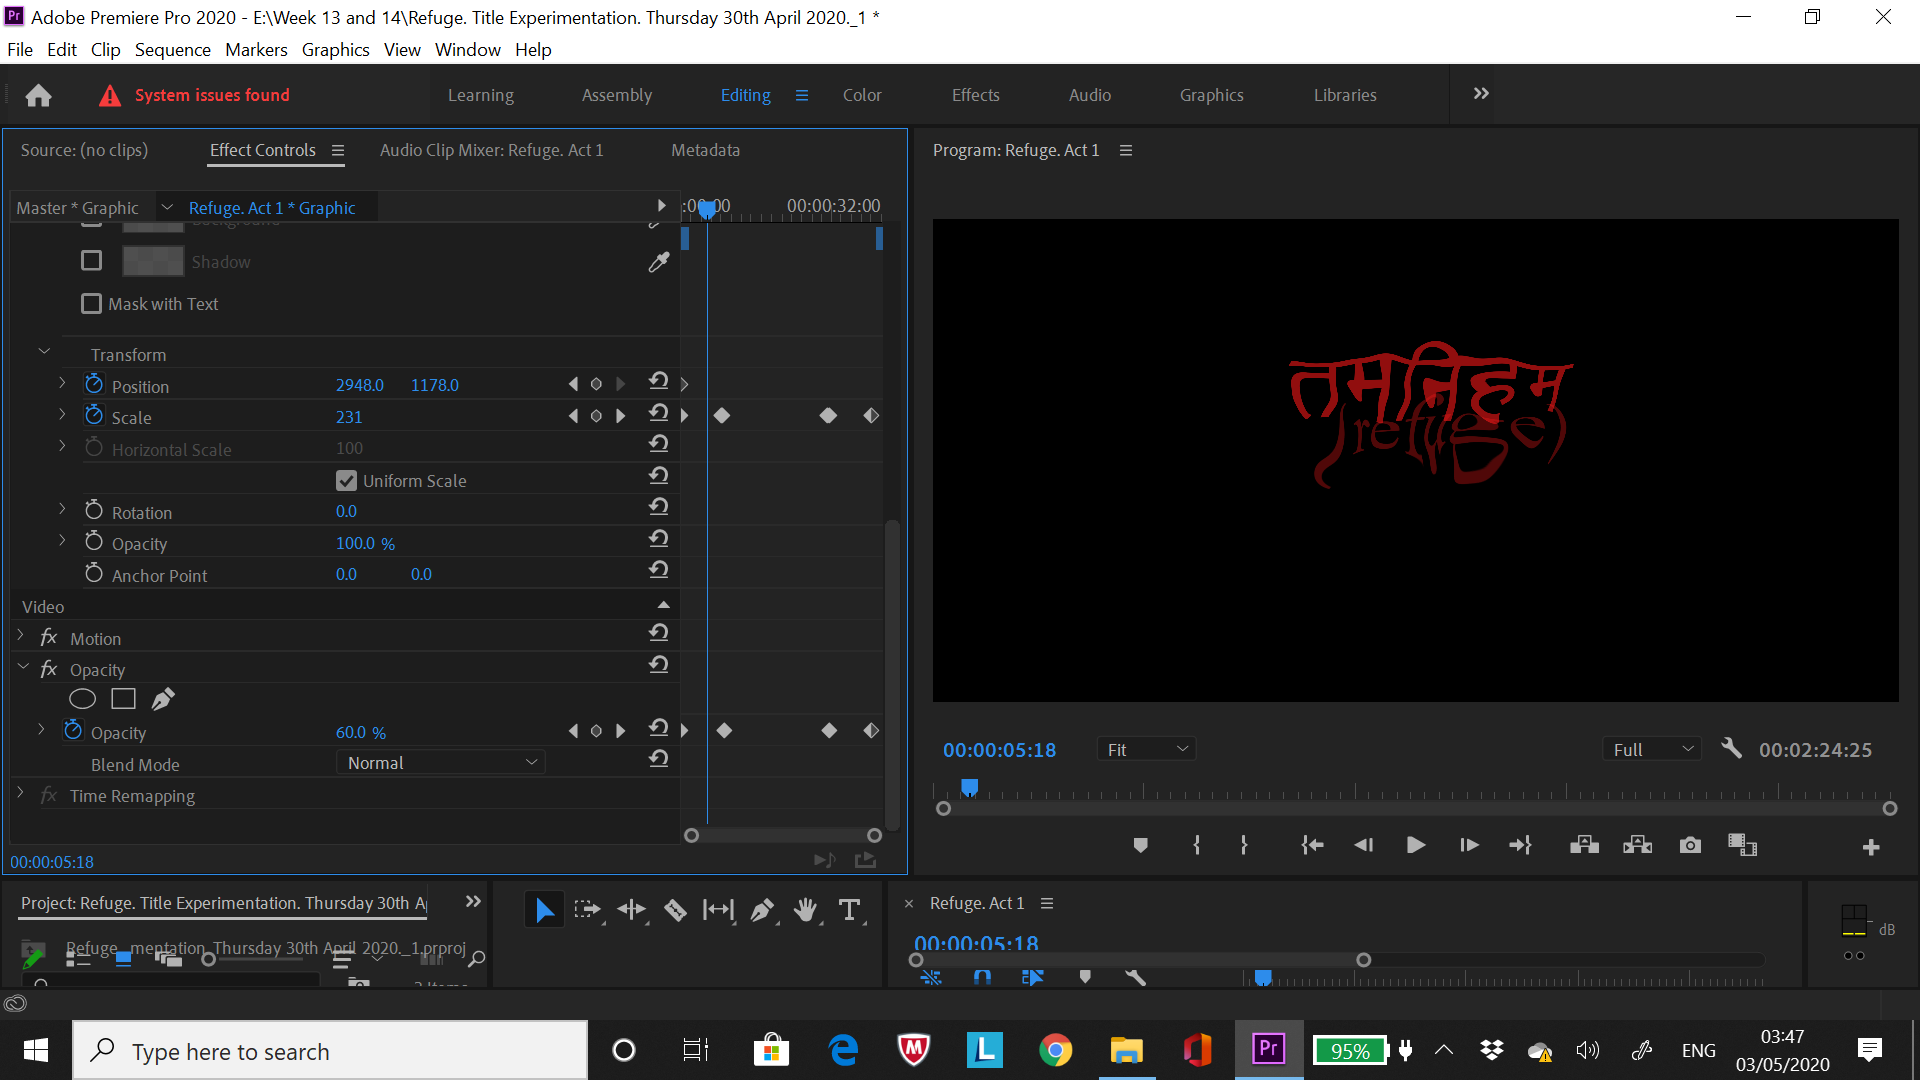
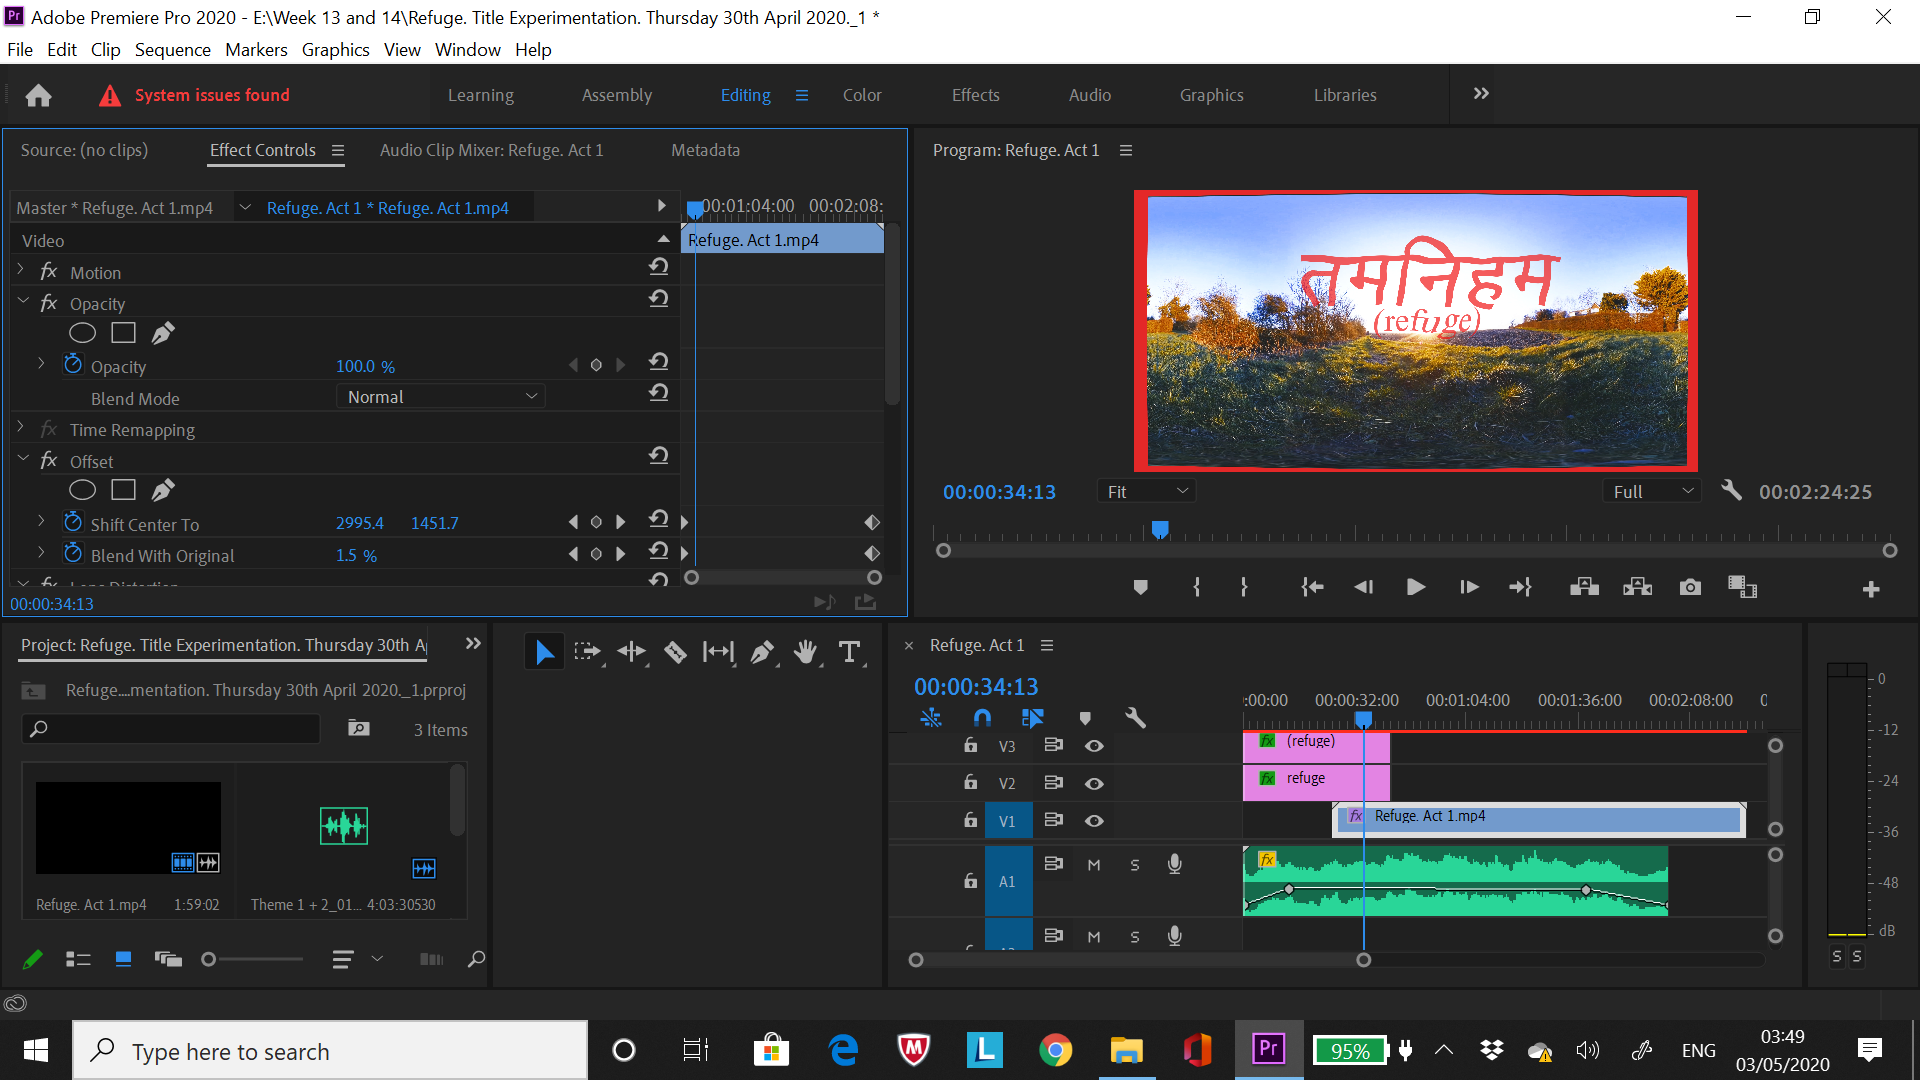
(03/05/20) The video that can be seen below demonstrates the implementation of the final title of the film and how the opening and closing credits will be presented in the final film. Music by Rory Condor ‘Theme 1 + 2’ is also incorporated into the clip below and will provide the final score for the film although two other composers are still in contact in relation to the film so there might be different versions of the film with its own score. The opening/closing titles will be smaller and more consistent in changing its size and form. Change colour of font from orange (o% opacity) to red (100% opacity) ?;
Screenshots below expand on the settings applied for the VR Film Title Experimentation Clip seen above. Some of these settings (title transitions) will be replicated for the Final edit of ‘Refuge’;
The photos that can be seen below showcase the further development of the VR Film ‘Refuge’ with the final three acts being laid out as well as briefly disucussing an issue I’ve been having in relation to the topic of GPU data storage and my conclusions on that.
Links to the word documents below highlight the message sent out the voice performers interested in performing for the final film as well as the rough mock up script that was sent to the said performers on the StarNow callout message section;
The word ‘Refuge’ felt suitable to the films narrative as a whole as the character in the film tries to seek refuge and tries to seek peace/natural control over the mental conflicts that briefly arise within the film. The viewer (player of oculus rift headset) will be in the position of the said character throughout my creative visual interpretation of a meditation/mindfulness session. Film might begin and end with a Gong sound (Eastern style music influence) to emphasise that the meditation/mindfulness influence that inspired the film. The other titles in comparison felt to vague or were too sombre for the film which in itself is not a sad film.
(03/05/20) Further Experimentation with the ‘Posterize’ and ‘Lens Flare’;
Link to Word document that can be seen below showcases Harvard Referenced Research in further experimentation for VR footage and ‘How to Balance Volume of Music/Sound Suite’;
(06/05/20) Further photos of Sketchbook Pages containing notes expanding on the incorporation of recordings provided by the voice performers for the VR Film Refuge;
(08/05/20) Further notes written in the sketchbook can be seen below documenting the final edits I made on the VR Film before sending it off to Rory Conder who will compose the music for the film at the time this was written. The final five performers are also chosen for the film and can be heard in the embedded YouTube Link seen below the photos of the sketchbook pages;
WARNING: The Embedded YouTube Link below will have High Volume so its recommended to not wear headphones as the sound is not tweaked at a point of being safe to listen to at the time this is written. Rory will provide tweaks to the volume to compliment the music he’ll make for the film;
The Logos below that were used in my Interactive Film ‘Groundless’ which are used again for the VR Film ‘Refuge’ can be seen below with Harvard References. This added to provided continuity and consistency between the two films I put together during the second year of this course;
I informed the composer and chosen performers on them being incorporated in the film via email or through the StarNow site. This was also done for the composers and performers who provided feedback or auditions over the past week but were ultimately not chosen for the final film.
The Word Documents containing the final messages to the chosen Voice Performers and the Performers who were not chosen can be seen linked below;
(10/05/20) The photos that can be seen below showcase the equipment and setup used by the composer ‘Rory Conder’ who kindly lent his time to work on the music for ‘Refuge’. A phone conversation was held to further talk about the film and the music’s details which at the time this was written will be completed by the 15th/16th May 2020;
The Word Document that can be seen below contains the final message to the composers who I communicated to over the last few weeks to confirm they’re not a part of the final film (Although like the Voice Performers I greatly appreciated their input and enthusiasm for the film initially);
The Word Document link that is highlighted below is the final Reflective Report for this Module, providing thoughts and feelings on the module itself and what I consider do if I was approached to this sort of work again;
The link embedded below is the final edited footage with no music and dialogue. This was sent to Rory (Composer) so he can add the final tweaks to the Music/Dialogue for the film;
The final edited version of the VR Film ‘Refuge’ with the final mastered music and dialogue can be seen embedded below;
I edited the final settings on the uploaded YouTube Video to higher quality which was lacking beforehand, Harvard Referenced Link to Video that informed of this can be seen below;
The Word Document linked below depicts the YouTube Link, Step by Step to Increase Quality of YouTube Video and Final Message to the Voice Performers who contributed to final rendition of the VR Film ‘Refuge’;
(26/04/20) The screenshot that can be seen below showcase the early mind maps and notes written out for the potential VR Film Title for the Graphic Design Module with added notes commenting on what I plan to do;
Rewritten out the notes highlighted in green as it is unreadable in the original photo taken above. ‘Look at two sites that provided translation for Tibetan and Latin words. I will incorporate the Tibetan words rather the Latin words as it links directly to the research produced for this module and the words look more elegant and pleasant to look at rather than the Latin translation’.
Further Screenshots highlighting the added the Video Effects applied to the experimental footage which is embedded in this blog post. A majority of the effects will be considered for the final VR Film although at the time this was written I hope to able to access the VR Immersion affects to polish up the final film as I currently aim unable to do this thus why I performed further experimentation with the other effects on Premiere pro;
First Experimental Video (25/04/20);
Second Experimental Video (26/04/20);
(28/04/20) The screenshots that can be seen below showcase the callout I created for potential voice actors who will contribute their vocals for the VR 360 film. Notes written in the sketchbook page planning out initial dialogue and where it fits in the film can also be seen below;
A Harvard Referenced link can be seen below showing the site which was used to influence some of the potential lines written out in the sketchbook page above;
The notes written below shows further discussion with Uttara via Messenger in relation to how the final tutorial on the final interactive piece will be structured;
The screenshots below demonstrate the early experimentation and setting up of account on the TinkerCAD site (as recommended by Emily Godden, tutor of Interactive Environments). This site was expanded upon as it proves to be a more straight forward and useful too to create the 3D structure for the Bluetooth Speaker being conceived by myself and Uttara rather than the site recommended by Andy Modowall (head of 3D department in University) which proved too complex and time consuming in nature for it to be considered for this module/project;
I overlooked the tutorials the site provides given me a better insight on how to produce the final 3D structure.
During Week 12 I also attempted to further looking into the ‘Processing’ program which will be implemented for the final piece via a unique music visualisation created by code. The Word Document below expands on the various sites and videos I looked upon while experimenting and research the topic of ‘Processing’ and how to operate the program as well as TinkerCAD (Flat Image transfer to TinkerCAD account etc). All sites/links are Harvard Referenced;
The screenshots below showcase the first issue that occurred while experimenting with the downloaded ‘Processing’ program which were later transferred to an email for Emily (Main Tutor of Module), asking her if there’s any solutions to problems encountered which I couldn’t find online;
Program Error-
File Layout (Added MP3’s etc via dragging file into an open ‘IDE’ i.e. main screen where coding is written out. The file should appear in ‘data’ file after being dragged to ‘IDE’)-
Extra screenshots showing adding ‘Minim’ and other features from ‘Library’ as well as displaying the coding that is being considered for the potential ‘Music Visualisation’ triggered when music is played through the ‘Bluetooth Speakers’;
(14/04/20) The screenshots that can be seen below depicts the further experimentation performed on TinkerCAD with the aim to create a rough mock up of the Bluetooth Speaker casing that will be implemented into the final tutorial in cooperation with Uttara.
After adding the tweaks to the experimentation, I was relatively happy with how it turned out especially within the short period of time spent on creating the two casings for the speaker. The access of transferring and editing flat images into 3D models for the rough casing was also an added bonus, giving the speaker more character as well as proving to create a more interesting contemporary aesthetic to the casing a whole.
Unlike the experimentation with the ‘Processing’ programme, the development with the TinkerCAD programme had less problems that needed to be sorted out and overall proved to be more productive in relation to offering interesting outcomes although I’m still in the early stages with both programs at the time this was written.
I sent these screenshots to Uttara via the Messenger app to receive feedback on what I produced so far and see if she approves of how the casing could potentially look. Components could be bought to attach both the casing designs together so it opens and closes like a treasure chest although the it is mentioned in a video that these components can be 3D printed so more research might be performed in this area if there is time.
TinkerCAD Rough Design of Outer Casing early development (with Batman Logo, Flower and Wolf Head);
TinkerCAD(Final Design of Rough Casing Idea with tweaked Images from the internet added to the 3D Model);
Using ShapeWay Program (First 3D simulation of 3D Model);
Using MatterHackers Program (Second 3D simulation of 3D Model);
MatterControl Robo 3D Program (Third 3D simulation of 3D Model). This would be used if the opportunity of producing a 3D Model was possible despite the current circumstances affecting this at the time this was written;
Final Settings used for the footage ‘No Tripod 1 to 4’ can be seen below via screenshots;
SL BIG BLUE MINUS-
SL NOIR 1965-
SL GOLD ORANGE-
SL CLEAN KODAK B ULTRASOFT-
SL CLEAN KODAK A NDR-
Further Premiere Pro Settings Experimentation that I will seriously consider incorporating it into the VR 360 Film can be further seen below;
High Temperature-
High Tint-
Low Temperature-
Low Tint-
I decided to export the five key settings above for the clips ranging from ‘No Tripod 1 to 4’ to save time on editing the settings on each individual clip as well as prevent the possibility of the premiere pro program crashing due to the amount of data needed to be encoded.
Screenshots of the tweaks I made to both music suites kindly produced by James and Jessica from StarNow via Adobe Audtion;
The four videos that can be seen below demonstrate the further experimentation I performed throughout Week 11 and 12 which are encoded below via my YouTube Channel=
Vortex/Anomaly Animation (No Music);
The animation that is seen above was produced specifically for ‘Experimentation 2’ on After Effects.
Experimentation 3 (No Binaural Sound);
Experimentation 2 (With Animated Anomalies);
I decided to play about more with the after effects programme and tweak the anomaly animation a bit more which I feel at the time I written this blog is looking rather nice with added music kindly provided by James Blunsdon as well as Jessica Bowsen (her music appearing in Experimentation 3).
Unlike the previous attempt at ‘Anomaly Animation’, I decided to used a still frame from Premiere Pro of the existing footage (using correct measurements for After Effects application so it fits the scaling on Premiere Pro) rather than the experimental photos of the location I shot on the Insta360 Camera app several weeks back. This was done to create a more smoother and less cluttered presentation of the animation as well introduce higher quality images that blend nicely into the existing footage. I felt this translated very well in the video presented above.
Experimentation 3 (With Binaural Sound);
Unlike ‘Experimentation 2’, ‘Experimentation 3’ showcases a clearer look at what the calmer sections of the film will look like with all the 5 chosen Lumetri settings on premiere pro present in the said video. This video also improved the Binaural Sound quality and editing which was lacking in ‘Experimentation 2. I’ll incorporate the clowing orb again but this time have it be similar to the anomalies/vortexes that appear left, right or centre of the viewers vision with the binaural sound (music) guiding the viewer to where the orb, vortex or anomaly is located.
A few more footage settings will be encoded for the final film to add to the diverse array of aesthetics seen in the video above which I feel will complement the final film and add to the fluid reality that accompanies meditation (metaphorically representing thoughts emotions and awareness of the body.).
Further Research performed during Week 11 and 12 which is utilised in the videos embedded above can be seen in the word document below;
(06/04/2020) Once I received feedback from the main tutor (Tina) and replies from the composers, I’ll start to develop the final footage and edits for the final VR 360 Film although further research will be performed if necessary as well as adopt suggestions on how the film could be better in presentation and quality.
The name of the film will be decided by next week and the possibility of bringing voice actors is also something that might be worth implementing for the final film although I’ll discuss this with my main tutor. The reason for considering voice actors is further emphasise both the intrusive thoughts and the mantras uttered/reoccurring throughout the meditation process. Maybe use existing quotes from Eckhart Tolle, The Dalai Lama or Jason Silva. (Play about with audio effects to distinguish spoken dialogue. Echoes, Pitch etc).


.")


![unnamed[4]](https://callumforster.home.blog/wp-content/uploads/2020/04/unnamed4.jpg)


![69382141_2478139089076628_2353318473897082880_o2[1]](https://i0.wp.com/callumforster.home.blog/wp-content/uploads/2020/04/69382141_2478139089076628_2353318473897082880_o21.jpg?w=546&h=546&crop=1&ssl=1 "69382141_2478139089076628_2353318473897082880_o2[1]")


")
")
")

")

")

 1")
 3")
 2")


 SL NOIR 1965")
 SL NOIR 1965 settings")
 SL GOLD ORANGE settings")
 SL GOLD ORANGE settings")
 SL CLEAN KODAK B ULTRASOFT settings")
 SL CLEAN KODAK B ULTRASOFT settings")
 SL CLEAN KODAK A NDR settings")
 SL CLEAN KODAK A NDR settings")
 SL CLEAN KODAK A NDR")
 SL CLEAN KODAK B ULTRASOFT.png 1")
 SL GOLD ORANGE")
 SL CLEAN KODAK A NDR")
 SL CLEAN KODAK B ULTRASOFT")
 SL GOLD ORANGE")
 SL CLEAN KODAK B ULTRASOFT.png 2")
 SL GOLD ORANGE")
 SL CLEAN KODAK A NDR")
 SL GOLD ORANGE")
 SL CLEAN KODAK A NDR")
 SL CLEAN KODAK B ULTRASOFT")


 Experimentation 2.")
