Graphic Design for the Web. Second Year, Second Trimester. Week 13 and 14. Further Development for VR 360 Film ‘Refuge’. Part 2. (Final VR Film ‘Refuge’ Embedded in this Blog).

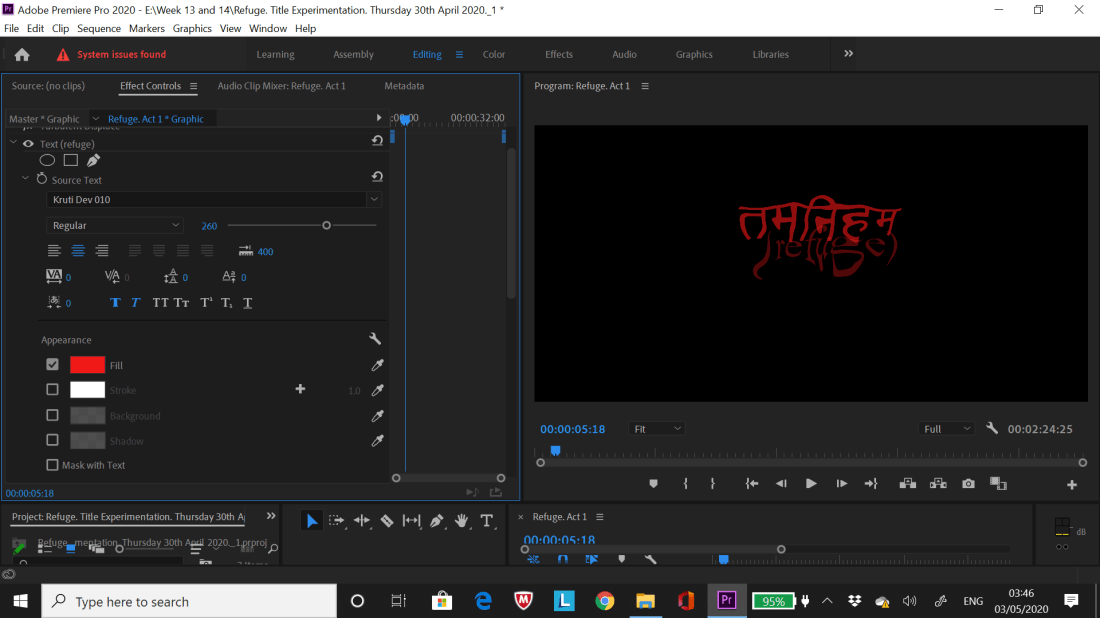
(03/05/20) The video that can be seen below demonstrates the implementation of the final title of the film and how the opening and closing credits will be presented in the final film. Music by Rory Condor ‘Theme 1 + 2’ is also incorporated into the clip below and will provide the final score for the film although two other composers are still in contact in relation to the film so there might be different versions of the film with its own score. The opening/closing titles will be smaller and more consistent in changing its size and form. Change colour of font from orange (o% opacity) to red (100% opacity) ?;

Screenshots below expand on the settings applied for the VR Film Title Experimentation Clip seen above. Some of these settings (title transitions) will be replicated for the Final edit of ‘Refuge’;

Text. Turbulent Displace 1.
Text. Source Text.
Text. Source Text.
Text. Transform and Opacity.
Act 1 Footage. Offset. (Title Experimentation).
Act 1 Footage. Lens Distortion. (Title Experimentation).
Text. Turbulent Displace 2
Text. Turbulent Displace 2.
Text. Turbulent Displace 3
Text. Turbulent Displace 3.

The photos that can be seen below showcase the further development of the VR Film ‘Refuge’ with the final three acts being laid out as well as briefly disucussing an issue I’ve been having in relation to the topic of GPU data storage and my conclusions on that.

0IMG-7829unnamed[4]

Links to the word documents below highlight the message sent out the voice performers interested in performing for the final film as well as the rough mock up script that was sent to the said performers on the StarNow callout message section;

Lines and Phrases for Acts 1 to 3 in VR 360 Film. Graphic Design for the Web. Trimester 2

Message to Voice Performers on StarNow. (Friday 01st May 2020).

The document containing research into Sanskrit and development of the films final name can be seen below with added Harvard Referencing;

Graphic Design Development (Sanskrit, VR Film’s Name etc.). Week 11 and 12.

The word ‘Refuge’ felt suitable to the films narrative as a whole as the character in the film tries to seek refuge and tries to seek peace/natural control over the mental conflicts that briefly arise within the film. The viewer (player of oculus rift headset) will be in the position of the said character throughout my creative visual interpretation of a meditation/mindfulness session. Film might begin and end with a Gong sound (Eastern style music influence) to emphasise that the meditation/mindfulness influence that inspired the film. The other titles in comparison felt to vague or were too sombre for the film which in itself is not a sad film.

(03/05/20) Further Experimentation with the ‘Posterize’ and ‘Lens Flare’;

Link to Word document that can be seen below showcases Harvard Referenced Research in further experimentation for VR footage and ‘How to Balance Volume of Music/Sound Suite’;

Further Development for VR Film (Lens Distortion and ‘Balancing Volume’)

(06/05/20) Further photos of Sketchbook Pages containing notes expanding on the incorporation of recordings provided by the voice performers for the VR Film Refuge;

(08/05/20) Further notes written in the sketchbook can be seen below documenting the final edits I made on the VR Film before sending it off to Rory Conder who will compose the music for the film at the time this was written. The final five performers are also chosen for the film and can be heard in the embedded YouTube Link seen below the photos of the sketchbook pages;

abced

WARNING: The Embedded YouTube Link below will have High Volume so its recommended to not wear headphones as the sound is not tweaked at a point of being safe to listen to at the time this is written. Rory will provide tweaks to the volume to compliment the music he’ll make for the film;

The Logos below that were used in my Interactive Film ‘Groundless’ which are used again for the VR Film ‘Refuge’ can be seen below with Harvard References. This added to provided continuity and consistency between the two films I put together during the second year of this course;

ARU Logo=
Study Net, 2019. ANGLIA RUSKIN UNIVERSITY – Study Net. [image online] Available at: <http://study-net.eu/product/anglia-ruskin-university/&gt; [Accessed 08 May 2020].

Facebook Page=
facebook.com, 2019. Callum Forster Art – Home. [image online] Available at: <https://www.facebook.com/callumforsterart/?epa=SEARCH_BOX&gt; [Accessed 08 May 2020].

Facebook Page Logo=
facebook.com, 2019. Callum Forster Art – Home. [image online] Available at: <https://www.facebook.com/callumforsterart/photos/a.1873147386242471/2478139085743295/?type=1&theater&gt; [Accessed 08 May 2020].

I informed the composer and chosen performers on them being incorporated in the film via email or through the StarNow site. This was also done for the composers and performers who provided feedback or auditions over the past week but were ultimately not chosen for the final film.

The Word Documents containing the final messages to the chosen Voice Performers and the Performers who were not chosen can be seen linked below;

Final Message to Voice Performers in VR Film ‘Refuge’. Graphic Design.

Final Message to the Voice Performers Not Chosen. Graphic Design.

(10/05/20) The photos that can be seen below showcase the equipment and setup used by the composer ‘Rory Conder’ who kindly lent his time to work on the music for ‘Refuge’. A phone conversation was held to further talk about the film and the music’s details which at the time this was written will be completed by the 15th/16th May 2020;

The Word Document that can be seen below contains the final message to the composers who I communicated to over the last few weeks to confirm they’re not a part of the final film (Although like the Voice Performers I greatly appreciated their input and enthusiasm for the film initially);

‘Final Message’ to composers who were not selected for the Final Film.

The Word Document link that is highlighted below is the final Reflective Report for this Module, providing thoughts and feelings on the module itself and what I consider do if I was approached to this sort of work again;

Final Reflective Report. Graphic Design for the Web.

The link embedded below is the final edited footage with no music and dialogue. This was sent to Rory (Composer) so he can add the final tweaks to the Music/Dialogue for the film;

The final edited version of the VR Film ‘Refuge’ with the final mastered music and dialogue can be seen embedded below;

I edited the final settings on the uploaded YouTube Video to higher quality which was lacking beforehand, Harvard Referenced Link to Video that informed of this can be seen below;

DIY With Michael Borders, 2019. Why are my videos Blurry on YouTube? – EASY Fix! – YouTube. Available at: <https://www.youtube.com/watch?v=iTBFv7T3JE0&gt; [Accessed 17 May 2020].

The Word Document linked below depicts the YouTube Link, Step by Step to Increase Quality of YouTube Video and Final Message to the Voice Performers who contributed to final rendition of the VR Film ‘Refuge’;

Link to final VR film and Step by Step to increase Quality of Video. Final Message to Voice Performers.

Graphic Design for the Web. Second Year, Second Trimester. Week 13 and 14. Further Development for VR 360 Film. Part 1.

(26/04/20) The screenshot that can be seen below showcase the early mind maps and notes written out for the potential VR Film Title for the Graphic Design Module with added notes commenting on what I plan to do;

01

Rewritten out the notes highlighted in green as it is unreadable in the original photo taken above. ‘Look at two sites that provided translation for Tibetan and Latin words. I will incorporate the Tibetan words rather the Latin words as it links directly to the research produced for this module and the words look more elegant and pleasant to look at rather than the Latin translation’.

Further Screenshots highlighting the added the Video Effects applied to the experimental footage which is embedded in this blog post. A majority of the effects will be considered for the final VR Film although at the time this was written I hope to able to access the VR Immersion affects to polish up the final film as I currently aim unable to do this thus why I performed further experimentation with the other effects on Premiere pro;

Turbulent DisplaceSpherizeTurbulent Displace 2Edge Feather

Lens Distortion and Turbulent Displace 3

First Experimental Video (25/04/20);

Second Experimental Video (26/04/20);

(28/04/20) The screenshots that can be seen below showcase the callout I created for potential voice actors who will contribute their vocals for the VR 360 film. Notes written in the sketchbook page planning out initial dialogue and where it fits in the film can also be seen below;

0102030405


unnamed67A7E90T

A Harvard Referenced link can be seen below showing the site which was used to influence some of the potential lines written out in the sketchbook page above;

yoga journal, 2020. 5 Sanskrit Words Every Yogi Should Know | The Essential Sanskrit Terms – Yoga Journal. [online] Available at: <https://www.yogajournal.com/practice/5-sanskrit-words-every-yogi-know>&nbsp; [Accessed 28 April 2020].

Graphic Design for the Web. Second Year, Trimester 2. Week 12. Further Development for the 360 VR Film.

Final Settings used for the footage ‘No Tripod 1 to 4’  can be seen below via screenshots;

SL BIG BLUE MINUS-

SL NOIR 1965-

SL GOLD ORANGE-

SL CLEAN KODAK B ULTRASOFT-

SL CLEAN KODAK A NDR-

Further Premiere Pro Settings Experimentation that I will seriously consider incorporating it into the VR 360 Film can be further seen below;

High Temperature-

High Tint-

Low Temperature-

Low Tint-

I decided to export the five key settings above for the clips ranging from ‘No Tripod 1 to 4’ to save time on editing the settings on each individual clip as well as prevent the possibility of the premiere pro program crashing due to the amount of data needed to be encoded.

Screenshots of the tweaks I made to both music suites kindly produced by James and Jessica from StarNow via Adobe Audtion;

The four videos that can be seen below demonstrate the further experimentation I performed throughout Week 11 and 12 which are encoded below via my YouTube Channel=

Vortex/Anomaly Animation (No Music);

The animation that is seen above was produced specifically for ‘Experimentation 2’ on After Effects.


Experimentation 3 (No Binaural Sound);

Experimentation 2 (With Animated Anomalies);

I decided to play about more with the after effects programme and tweak the anomaly animation a bit more which I feel at the time  I written this blog is looking rather nice with added music kindly provided by James Blunsdon as well as Jessica Bowsen (her music appearing in Experimentation 3).

Unlike the previous attempt at ‘Anomaly Animation’, I decided to used a still frame from Premiere Pro of the existing footage (using correct measurements for After Effects application so it fits the scaling on Premiere Pro) rather than the experimental photos of the location I shot on the Insta360 Camera app several weeks back. This was done to create a more smoother and less cluttered presentation of the animation as well introduce higher quality images that blend nicely into the existing footage. I felt this translated very well in the video presented above.

Experimentation 3 (With Binaural Sound);

Unlike ‘Experimentation 2’, ‘Experimentation 3’ showcases a clearer look at what the calmer sections of the film will look like with all the 5 chosen Lumetri settings on premiere pro present in the said video. This video also improved the Binaural Sound quality and editing which was lacking in ‘Experimentation 2. I’ll incorporate the clowing orb again but this time have it be similar to the anomalies/vortexes that appear left, right or centre of the viewers vision with the binaural sound (music) guiding the viewer to where the orb, vortex or anomaly is located.

A few more footage settings will be encoded for the final film to add to the diverse array of aesthetics seen in the video above which I feel will complement the final film and add to the fluid reality that accompanies meditation (metaphorically representing thoughts emotions and awareness of the body.).

Further Research performed during Week 11 and 12 which is utilised in the videos embedded above can be seen in the word document below;

Graphic Design for the Web. Research (Harvard References). Week 11/12.

(06/04/2020) Once I received feedback from the main tutor (Tina) and replies from the composers, I’ll start to develop the final footage and edits for the final VR 360 Film although further research will be performed if necessary as well as adopt suggestions on how the film could be better in presentation and quality. 

The name of the film will be decided by next week and the possibility of bringing voice actors is also something that might be worth implementing for the final film although I’ll discuss this with my main tutor. The reason for considering voice actors is further emphasise both the intrusive thoughts and the mantras uttered/reoccurring throughout the meditation process. Maybe use existing quotes from Eckhart Tolle, The Dalai Lama or Jason Silva. (Play about with audio effects to distinguish spoken dialogue. Echoes, Pitch etc).


Graphic Design for the Web. Second year, Trimester 2. Week 11. Further Development and Experimentation for the VR 360 Film.

The selection of images that can be seen below demonstrate the various ‘Lumetri Colour’ options present on the Premiere Pro Programme that I feel would compliment the final look for the VR 360 Film. Several of the options will be highlighted Red to indicate which option are considered for the final film. The options are considered for both the positive and negative sequences of the film;

Kodak 5205 Fuji 3510 (by Adobe);

1

Monochrome Kodak 5205 Fuji 3510 (by Adobe);

2

SI BIG;

3

SL BIG MINUS BLUE;

4

SL BLUE ICE;

5

SL BLUE MOON;

6

SL CLEAN FUJI B SOFT;

7

SL CLEAN KODAK A NDR;

8

SL CLEAN KODAK A HDR;

9

SL CLEAN KODAK B ULTRASOFT;

10

SL CROSS HDR;

11

SL GOLD ORANGE;

12

SL MATRIX GREEN;

13

SL NEUTRAL START;

14

SL NOIR 1965;

15

SL NOIR LDR;

16

SL NOIR NOUVELLE;

17

(31/03/20) During Week 11 via email James manage to produce a second music suite with darker intonations as proposed by myself to him in Week 10. At the time I’m writing this down I have been very impressed with the quality of music produced by James Blunsdon and Jessica Bowen. I’ve yet to hear from the other composers who showed interest in this film and received the email I sent them several weeks back.

James (Muisc Suite 2) Darker

The names of the chosen Options from the 15 overlooked earlier in this blog can be seen below in bullet points. I plan to hopefully incorporate all these options in the final film to differentiate between certain scenes in the film as well as hopefully providing more visual substance to the final presentation of the film as a whole;

  1. SL BIG MINUS BLUE
  2. SL CLEAN KODAK A NDR
  3. SL CLEAN KODAK B ULTRASOFT
  4. SL GOLD ORANGE
  5. SL NOIR 1965

Still Frames of the Footage that will be used for film will also adopt the options listed above.


The YouTube Videos that can be seen below list all the experimental MP4 clips I created over the last few weeks on Premiere Pro and After Effects respectively. I felt it was worth posting the videos here so they can viewed in their entirety rather than through screenshots. This will be implemented in future blogs through embedding.


Tweaked Tiff File (Frame) of ‘SL BIG MINUS BLUE’ lumetri colour seen below which was used for transition from moving footage to still photo with moving anomaly animation seen in the clip ‘Test A. Week 11. James Second Music Suite’ above;

1


‘Warp’ feature with ‘FishEye’ applied to create a pulsating effect to the original static PNG within the clip ‘Test A. Week 11. James Second Music Suite’;

Warp Tweaks. (FishEye).

Graphic Design for the Web. Second Year, Trimester 2, Week 9. Development of VR 360 Film and Communication with Composers via StarNow.

The first Word Document link that can be seen below demonstrate the first communication I had with the potential composers who show interest in working on my VR 360 Film;

Composers StarNow. Graphic Design. Week 9.

Screenshots of the Call Out I sent via my StarNow Account can be seen below;


(20/03/20)=

The link to word document below expands on referencing to research I performed on further experimentation for Final VR 360 film as well as rough mock up of second message sent to chosen composers for final film;

Development of VR 360 Film (Week 9). Second message to Composers.

Screenshots and JPEG’s that can be seen below showcase the experimentation I performed on After Effects, Photoshop and Premier Pro whether it is testing out possible animation for the final film or seeing which portal/anomaly design best fits the film;

Wednesday 18th March 2020-

PNG of First Orb I created on Photoshop when watching a tutorial on YouTube and screenshots of an animation created using Premiere Pro;

Glowing Orb (Graphic Design). Week 9. 1.

Despite being able to create an orb for the film it has been decided by myself that it is better to use the early glowing vortex without the swirly effects as depicted in a photoshop tutorial on YouTube. This is due to the early glowing vortex looking more aesthetically pleasing than the orb I produced above.

A reoccurring problem that is seen both in the Orb and Vortex Experimentation is the implementation of ‘VR Immersion’ effects not working on Premier Pro or After Effects. The lack of GPU Acceleration accounts to the effects not working. Despite this problem I should be able to use the other effects tools to achieve the same immersive features although it’s a shame that I can’t use the original ‘VR Immersions’ effects.

PNG of Vortex/Anomaly I created from YouTube Tutorial and Screenshots of Animation that incorporates Vortex/Anomaly;


Unlike the experimentation with the Orb, the rough Vortex Animation proved to be very effective both on the unedited footage as well as edited footage. The only issue that occurred was too successfully transfer the transparent background with the vortex animation (Link to tutorial seen in one of the words documents on this blog) over the edited background.

Even though I successful achieved this (documented below) I’ll consider editing an original photo with the tripod removed rather than moving footage which proves to creates too much information when After Effects or Premier Pro is rendering the experimental VR MP4’s. The overload of information led to the Premier Pro or After Effects programmes to fail rendering or crash.

Thursday 19th March 2020-

Screenshots below expand on the further experimentation I performed in attempting to combine the animated spinning vortex together with the VR footage tweaked in colour adjustment;

Changed colour of VR Footage without Tripod (Tripod removed successfully during Week 8)-

3a

Spinning Vortex Animation (After Effects) without Transparent Background. I manged to save a file of animation with a transparent background which is incorporate in the final animation experiment seen after these screenshots;


Screenshots below showcase final successful animation experiment of combining vortex and tweaked footage;


The photos that can be seen below showcase further notes and development for the VR 360 Film during Week 9 with a mind map dedicated to the early ideas of what the film might be called;

Graphic Design. Week 9. 2.

Graphic Design for the Web. Second Year, Second Trimester Week 8. Further Development of VR 360 Film (After Effects etc).

The screenshots that can be seen below showcase the VR settings in action on YouTube after uploading the ‘VR 360 Film Test #1’. The chosen Preset that I will further use in the future is ‘VR Monoscopic Match Source Stereo Audio’ which enables the ‘Binaural Sound Quality’ I want to replicate into the final VR Film;


Further Screenshots showcase the other VR Features that are present on my YouTube Account when I played the video on my iPhone. Footage is split into to sections mimicking how a VR Headset works. Extra images can also be seen demonstrating my initial research into creating Binaural Sound Effects on Premier Pro which I successfully recreated;


Overall I am quite pleased with the outcome of the VR 360 Film Test #1 with many assets that i wanted to replicate into the film being made achievable and assessable for the future development on the final VR 360 Film.

The Word Document that can be seen below expands upon further research I have performed on how to create a VR 360 Film from Week 6 to Week 8;

VR 360 Film (Binaural Research) Week 7 and 8.

Graphic Design for the Web. Second Year, Trimester 2. Week 7. Further Development and Sketchbook Pages. Jason Silva Research.

The sketchbook page that can be seen below showcase the notes taken after I had a one to one tutorial with Tina (Tutor) during Week 7. Note talking about change of direction for the project idea and planning for what I’ll do for the rest of the week;

01

The link to the Word Document below expands on the research I done on the Futurist ‘Jason Silva’, who will contribute greatly to the visual and conceptual presentation of the 360 VR Film I’ll attempt to create for this module;

‘Jason Silva’ Research. Week 7. Graphic Design.

Graphic Design for the Web. Second Year, Trimester 2. Week 6. Mood Board. Further Development with 360 Camera and Oculus VR Headset (Unity Research).

After talking to Tina (Main Tutor) it is recommended that I continue to further continue with the 360 Camera development as well as have a play with the Oculus VR Headset (Look at several Tutorials on how to achieve basic actions and motions for game I’ll create). The suggestion of using ‘Adobe After Effects’ for the 360 Footage/Photo will also be explored throughout the duration of this week (shown through Screenshots and written notes).

24/02/20: At the time this was written I plan to shoot the 360 Footage/Photo on the ground of the chosen location the field although I plan to find (and potentially utilise) a long tripod to place a 360 Camera on. The reason I’ll shoot on the ground is I feel it will create an interesting environment for the player with everything being bigger in proportion rather than trying to recreate the original proportions. I’ll attempt to experiment with the equipment in the bag the camera resides in anyway on Thursday 27th.

The Word Document that can be seen below expands upon a Mood board conveying the imagery and key components that I plan to incorporate into the VR game as well as photos of two to three photos of books I’ll consider incorporating into the VR Game (Research with Added Harvard Referencing). A photo of another Rough Storyboard for the VR Game is also present in the document;

Mood board and Second Rough Storyboard with Harvard Referencing (Books and Images Online). Graphic Design for the Web.

The photos that can be seen below showcase the shoot I performed with the Insta360 camera on the Thursday 27th February 2020. A 360 photo and Video were both taken in the respective locations that can be seen below. The locations that I’ll further upon will be highlighted with a star * opposite the images name;

Location A=


Location B=


Location C=


Location D=


Location E=


Location F=


Location G*=


Location H*=


Location I=


(29/02/20) The Word Document that can be seen below expands on the research I committed to uncovering how to use ‘Unity’ and ‘After Effects’ with added notes and thoughts I have on the how the possible VR Game or Film will be made;

Research (Interactive features on After Effects). Graphic Design. Week 6.

Sketchbook pages below expand on similar notes written within the word document above and scheduling meet ups with the Tutor’s on asking questions about the project I’m working upon;


Graphic Design for the Web. Second Year, Trimester 2. Week 5. Sketchbook Pages (Development) and Experimentation with ‘Insta360 ONE X’ Camera (Screenshots and Written Thoughts).

No Blog Post for Week 4 due to absence of Modules Tutor (Tina Burton), the session was cancelled as a result.

The photos that can be seen showcase further development of the Meditation/Mindfulness idea with written notes and mind maps with drawing further fleshing out how the Interactive Application will roughly look like once completed;

Screenshots and notes that can be seen below demonstrate the experimentation with the ‘Insta360 ONE X’ Camera’ borrowed from the University for the ‘Meditation/Mindfulness’ Interactive application for this module;

01 (Ints 360 Camera).
AHSS Siso Site 1
02 (Insta 360)
AHSS Siso Site 2 (Focus on links to PDF’s)
03 (Insta 360 Camera)
Email confirming for use of borrowing Insta 360 Camera and PDF’s accompanying it.


Harvard References to PDF’s needed to operate the ‘Insta360 ONE X’ camera and edit 360 footage which will be captured over the coming week. Images used for Wire frame can also be seen below;

ahss.siso.co, 2020. Microsoft World – How to edit 360 videos in Premier Pro.docx. [pdf] Insta360 ONE X Camera ~ Arts, Humanities & Social Sciences ~ smarthub. Available at: <https://ahss.siso.co/uploads/documents/howtoedit360videosin_1562853311.pdf> [Accessed 18 February 2020].

ahss.siso.co, 2020. Insta360 One X Quickstart Guide. [pdf] Insta360 ONE X Camera ~ Arts, Humanities & Social Sciences ~ smarthub. Available at: <https://ahss.siso.co/uploads/documents/insta360onexquicksta_1562852766.pdf> [Accessed 18 February 2020].

Clipart Library, 2018.Free Human Body Outline Printable, Download Free Clip Art on Clipart Library. [image online] Available at: <http://clipart-library.com/human-body-outline-printable.html&gt; [Accessed 18 February 2020].

StickPNG, 2018. Arrow Bw Curved Right transparent PNG – StickPNG. [image online] Available at: <https://www.stickpng.com/img/icons-logos-emojis/arrows/arrow-bw-curved-right&gt; [Accessed 18 February 2020].

JPEG (produced on Photoshop) that can be seen below showcase the early planning on how the Interactive Application will appear both when the player is wearing the VR Headset as well as demonstrate what can be expected within the game itself which the player interacts with;

Wireframe Photoshop (Mindfulness VR Application) JPEG

*’Anomaly’ is spelt wrong in the JPEG but everything else should be correct.

Photos seen below showcase the Colour Schemes (Colour Wheel) seen in my Rough Wire frame seen above. The iPhone app ‘Adobe Capture’ was used to achieve the Colour Schemes that are presented in this blog;


The screenshots that can be seen below expand on the experimentation I performed on the Insta360 Camera which borrowed during Week 5 till the beginning of Week 6-

Photos from Insta360 Camera App that I used on my iPhone to take the photo/video on 20/02/20;


GoPro VR Player – Adobe Plugin screenshots of untweaked 360 Footage (Footage manipulated using touchscreen via iPad etc.);


Screenshots of Experiment 1 performed on 360 Footage on Premiere Pro;


Screenshots of Experiment 2 performed on 360 Footage within Premiere Pro (Change in GPU Acceleration etc) and GoPro VR Player site;


The second attempt at experimenting with the Insta360 Camera during 21/02/2020 can be seen below with my first attempt at attempting a ‘bullet time’ footage=

Screenshots from tweaks to Video/Photo/Bullet Time on the Insta360 Camera App can be seen as follows:

360 Photo-


360 Video-


360 Bullet Time Unedited-


360 Bullet Time Edited;


Insta360 Camera App Main Menu;


The thoughts I have after experimenting with the Insta360 Camera both on the 20th and 21st February 2020 is amazement of how easy it is to utilise the camera both in taking it from one place to another and how well captured the footage is and the various editing tools that it provides.

After the two days spent on playing about with the Insta360 Camera it has become apparent to that this could provide a firm basis for either this module or the module ‘Interactive Environments’ where this form of technology can be used to its full advantage.

Further experimentation will be considered for this particular brand of tech with tweaks to footage/photos/bullet time shot in Week 5 to thoughts of seriously creating new footage/photos/bullet time pieces.

Harvard Referencing to PDF documents demonstrating the step by step of using a Insta360 Camera can be seen below (as well as other sites pointing out how to manipulate footage on the phone app, premier pro etc);

ahss.siso.co, 2020. Insta360 One X Quickstart Guide. [pdf] ahss.siso.co. Available at: <https://ahss.siso.co/uploads/documents/insta360onexquicksta_1562852766.pdf&gt; [Accessed 22 February 2020].
ahss.siso.co, 2020. Microsoft Word – How to edit 360 videos in Premiere Pro.docx. [pdf] ahss.siso.co. Available at: <https://ahss.siso.co/uploads/documents/howtoedit360videosin_1562853311.pdf&gt; [Accessed 22 February 2020].

insta360.com, 2019. Bullet Time Tutorial. [online] Available at: <https://www.insta360.com/support/supportcourse?post_id=9466&gt; [Accessed 22 February 2020].
blog.insta360.com, 2018. Insta360 ONE X Case Comparison – Insta360 Blog. [online] Available at: <http://blog.insta360.com/insta360-one-x-case-comparison/&gt; [Accessed 22 February 2020].

Further Screenshots can be seen below demonstrating the added Adjustments, Titles and VR Immersion to the 360 Video blog I shot during Week 5;

Despite a lot of cool features added after the edits performed on Premier Pro, the only negative is how long it takes for the VR Video to be exported as it ranges from 2 hours to 6 hours. I had to performed small edits to each edited 360 video MP4 Files exported; the reason for this id when I attempted to add a lot of features and edits to a single 360 video MP4 File it not only crashed the Premier Pro Programme but also the export time would’ve been a full 24 hours to encode.

I’ll strongly consider further working on the Insta360 Camera for the rest of the project due to the many great qualities it has to contribute to an engaging Interactive Application for this module.


Graphic Design for the Web. Trimester 2. Week 3. Technology Comparison Chart, Idea Pitch PowerPoint Presentation and Notes from Sketchbook.

The photos that can be seen below showcase the notes written in the class during Week 3 and research performed for the ‘Technology Comparison Chart’ through reading articles and watching tutorials;


The Word Document that can be seen linked below showcases the ‘Technology Comparison Chart’ produced in preparation for developing the final interactive application for this module with extra note written seen above in the screenshots related to the technology discussed in the chart;

Technology Comparison Chart. Week 3. Graphic Design Design.

The PowerPoint Presentation that can be seen below demonstrates the ‘Idea Pitch’ I had initially during the development stages of this module;

Final Idea Pitch (Powerpoint Presentation). Graphic Design. Week 4.